
HAT-MAKING PROJECT - IELTS Listening Answers & Explanations
From Cambridge IELTS 03 Academic Listening Test 2 · Part 4 · Questions 31–40
Audio
Questions
Questions 31–32 Note Completion
Complete the notes below.
Write NO MORE THAN THREE WORDS AND/OR A NUMBER for each answer.
HAT-MAKING PROJECT
Project Profile
| Example
Name of student: |
Answer
Vivien |
Type of school: 31
Age of pupils: 32
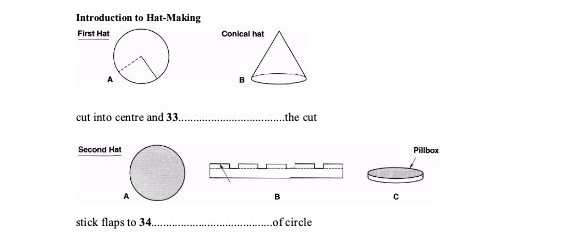
Questions 33–34 Diagram Labeling
Label the diagrams.
Write NO MORE THAN THREE WORDS for each answer.
Questions 35–37 Note Completion
Complete the notes below.
Write NO MORE THAN THREE WORDS for each answer.
DESIGN PHASE
| Stage A | Refer to research and design a hat 35 |
| Stage B | Make a small-scale 36 hat |
Constraints
- material: paper
- colours: 37
- glue: must not show
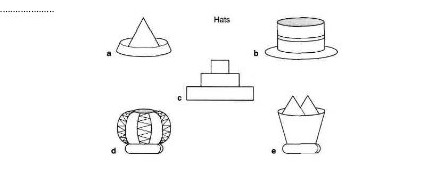
Questions 38–40 Visual Labeling
Indicate who made the hats below. Write the appropriate letter A-E next to each name.
Answers & Explanations Summary
| # | Answer | Evidence | Explanation |
|---|---|---|---|
| Q31 | secondary | Mr Yardley has asked me to describe to you the project I did as a student teacher at a secondary school in London | Excerpt/Transcript Explanation: The transcript shows that Vivien's placement as a student teacher was at a secondary school, which is the type of school the question asks for. Answer Explanation: The answer "secondary" identifies the level or type of school where the project took place. Reason For Correctness: The correct answer is "secondary" because Vivien explicitly mentions that she completed her teaching practice at a "secondary school in London." A secondary school is a school for students usually between the ages of 11 and 18, which aligns with the pupils being fourteen years old. |
| Q32 | 14 year olds / 14 years old / 14 / fourteen year olds / fourteen years old / fourteen | I was at this school for six weeks and I taught a variety of subjects to a class of fourteen-year-old pupils | Excerpt/Transcript Explanation: The transcript confirms that the age of the students in Vivien's class was 14. Answer Explanation: The answer says that the students who did the project were 14 years old. Reason For Correctness: The correct answer is clear because the speaker, Vivien, says the exact age of her students at the start of her talk. She mentions that she worked with a class of fourteen-year-old pupils at a secondary school. In English, the word 'fourteen' means the number 14, and 'pupils' is another word for students. |
| Q33 | over-lap / overlap / over-lapping / overlapping | cutting out a circle and then making one cut up to the centre and then overlapping the cut like this |
Excerpt/Transcript Explanation: The transcript describes the step-by-step method for making a cone hat: first, you cut a circle; second, you cut to the middle; and third, you place parts of the cut paper over each other. Answer Explanation: The answer describes the action of putting one edge of the cut paper over the other edge to create a cone shape. Reason For Correctness: The correct answer identifies the specific physical action used to form the first hat shape. Vivien explains the process of making a 'conical hat' by first cutting a circle, then making a single cut to the middle. The final step to give the hat its shape is to 'overlap' the two edges created by that cut. To 'overlap' means to have one thing partially cover another thing, which creates the cone structure. |
| Q34 | underside / underneath / bottom | you bend the flaps over and stick them with glue or prittstick . . . to the underside of the circle |
Excerpt/Transcript Explanation: The transcript explains how to put the hat together by taking the small folded parts (flaps) and sticking them to the bottom surface—the underside—of the round paper piece. Answer Explanation: The answer identifies the specific area of the circular paper piece where the flaps are glued to build the hat. Reason For Correctness: The correct answer is based on the speaker's instructions for making a 'pillbox hat.' She explains that after cutting a circle and preparing a strip with flaps, the flaps must be bent and then glued to the 'underside' of the circle. The words 'underneath' and 'bottom' are used as synonyms for 'underside' to show where the attachment happens. |
| Q35 | on paper / in two dimensions | The next stage of the project was the design phase and this involved, first of all, using their pages of research to draw a design of their hat on paper. That’s the easy part. They then had to translate their two-dimensional design into a form to fit their head | Excerpt/Transcript Explanation: The transcript says that at the start of the design part, students used what they learned from their research to draw their hats on paper. This flat drawing is referred to as a two-dimensional design. Answer Explanation: The answer means that the students first drew the plans for their hats on a flat sheet of paper. Reason For Correctness: The correct answer is found in Vivien's explanation of the first step in the design phase. She says that students used their research pages to draw their hat designs on paper. In the next sentence, she calls this a two-dimensional design, which confirms that the initial plan was a flat drawing. |
| Q36 | 3-dimensional / three-dimensional / 3-D / 3D | I encouraged them to make a small-scale, three-dimensional hat first so that they could experiment with how to achieve the form they required and I imposed certain constraints on them to keep things simple | Excerpt/Transcript Explanation: The transcript shows that Vivien wanted the students to build a 3D model of their hat on a small scale so they could test their design before making the final version. Answer Explanation: The answer refers to an object that has height, width, and depth, meaning it is not flat like a drawing but has a physical shape you can hold. Reason For Correctness: The correct answer is "three-dimensional" because during the portion of the talk about the "design phase," Vivien describes the specific steps the students took. After drawing their ideas on paper (Stage A), she notes that they moved to Stage B, where they created a tiny model. She specifically uses the phrase "small-scale, three-dimensional hat" to describe this step. In the notes, because the text already says "small-scale," the missing word to describe the type of hat is "three-dimensional." |
| Q37 | white grey brown / white,grey,brown / white gray brown / white,gray,brown | They also had to limit their colours to white, grey or brown shades of paper which reflected the colours of the buildings they were using as a model for their hats and they had to make sure their glue didn’t show | Excerpt/Transcript Explanation: The transcript says that the students were only allowed to use paper that was white, grey, or brown because these colors looked like the buildings they were using as examples. Answer Explanation: The answer lists the three colors—white, grey (or gray), and brown—that the students were required to use for their project. Reason For Correctness: The correct answer comes from the part of the talk where Vivien discusses the 'constraints' or rules for the project. She explains that she chose to limit the students' choices to specific colors to match the look of the buildings they were studying. To answer correctly, one must identify the 'colours' Vivien lists as the only options allowed for the paper. |
| Q38 | C | This one here is based on a circular stairway in an old building in London. It uses three pillbox hats one on top of the other. This was designed by Theresa | Excerpt/Transcript Explanation: The transcript explains that Theresa designed a hat that uses three round shapes (pillbox hats) placed one over another to look like a spiral staircase. Answer Explanation: The answer C refers to a specific hat design shown in a picture that matches the description of what Theresa made. Reason For Correctness: The correct answer is C because the speaker, Vivien, describes a hat made by a student named Theresa. She explains that Theresa's hat is made by stacking three "pillbox hats" (small, round, flat-topped hats) on top of each other, which makes it look like a round set of stairs from an old building. In the context of the task, picture C shows this specific design. |
| Q39 | D | Here’s another one that has a simple strip going round the base of the hat but has then gone on to add strips of paper that come out from the base and that meet at the top of the hat -rather like a crown - making a fairly tall hat. This was made by Muriel | Excerpt/Transcript Explanation: The transcript explains that Muriel's hat has a bottom strip and extra pieces of paper that meet at the top, making it look like a crown and giving it height. Answer Explanation: The answer is D, which corresponds to the description of the hat created by Muriel. Reason For Correctness: The correct answer is D because Vivien explicitly describes the hat designed by Muriel. She mentions that this specific hat has a simple strip at the bottom (the base) with additional strips of paper that extend from that base and join together at the top. She notes that it looks similar to a crown and is a relatively tall hat. |
| Q40 | A | And lastly there’s a combination of the pillbox or single strip around the base and then the conical hat shape on top to form a castle turret. This was made by Fabrice, and there are many more that I could have brought | Excerpt/Transcript Explanation: The transcript says that Fabrice made a hat by mixing a round base with a cone shape on top to make it look like a tower on a castle. Answer Explanation: The answer A means that Fabrice is the person who created the hat design described last in the presentation. Reason For Correctness: The correct answer is A because, in the transcript, Vivien describes a hat that looks like a castle turret (a small tower). She explains that this specific hat was made by combining two shapes: a flat, round 'pillbox' base and a 'conical' (cone-shaped) top. She identifies Fabrice as the student who designed and made this particular hat. |
Transcript
TUTOR: Right. Are we all here? OK. As you know, today Vivien is going to do a presentation on the hat-making project she did with her class during her last teaching practice. So, over to you, Vivien.
VIVIEN: Thanks. Um . . . Mr Yardley has asked me to describe to you the project I did as a student teacher at a secondary school in London. I was at this school for six weeks and I taught a variety of subjects to a class of fourteen-year-old pupils. The project I chose to do was a hat-making project and I think this project could easily be adapted to suit any age. So, to explain the project.. . After we’d done the research, we went back to the classroom to make two basic hat shapes using rolls of old wallpaper. We each made, first of all, a conical hat by ... er ... if I show you now . . . cutting out a circle and then making one cut up to the centre and then ... er ... overlapping the cut like this this ... a conical hat that sits on your head. The other hat we made was a little more complicated ... er ... first of all we cut out a circle again . . . like this . . . then you need a long piece with flaps on it - I’ve already made that bit which I have here - you bend the flaps over and stick them . .. with glue or prittstick . . . to the underside of the circle . .. like this. Again, I’ve prepared this so that I don’t get glue everywhere. The pupils do, of course, so you need plenty of covers for the table. And there you have a pillbox hat as in pill and box. Now variations and combinations of these two hat shapes formed the basis of the pupils’ final designs.
The next stage of the project was the design phase and this involved, first of all, using their pages of research to draw a design of their hat on paper. That’s the easy part. They then had to translate their two-dimensional design into a form to fit their head. I encouraged them to make a small-scale, three-dimensional hat first so that they could experiment with how to achieve the form they required and I imposed certain constraints on them to keep things simple. For example, they had to use paper not card. Paper is more pliable and easier to handle. They also had to limit their colours to white, grey or brown shades of paper which reflected the colours of the buildings they were using as a model for their hats and they had to make sure their glue didn’t show! Well, it was very enjoyable and just to give you an idea of what they produced, I’ve brought along three hats to show you. This one here is based on a circular stairway in an old building in London. It uses three pillbox hats one on top of the other. This was designed by Theresa. Here’s another one that has a simple strip going round the base of the hat but has then gone on to add strips of paper that come out from the base and that meet at the top of the hat -rather like a crown - making a fairly tall hat. This was made by Muriel. And lastly there’s a combination of the pillbox or single strip around the base and then the conical hat shape on top to form a castle turret. This was made by Fabrice, and there are many more that I could have brought.
TUTOR: Thank you, Vivien. That was most interesting. Now what we can learn from this is that.. .