🔥 Today Only: Save 30% on Premium — Offer Ends Soon! - Upgrade Now!
Process Diagram

Band 7+: The diagram shows how a type of tent called a tepee is built. Summarise the information by selecting and reporting the main features and make comparisons where relevant.

Image for topic: The diagram shows how a type of tent called a tepee is built. Summarise the information by selecting and reporting the main features and make comparisons where relevant.
Our system will evaluate the answer based on this AI-generated description.
The image consists of a step-by-step diagram on constructing a teepee. Depicted in eight sequential panels, each pane provides a phase of the construction process with labeled elements critical to the setup. Panel 1 shows the arrangement of sticks. In Panel 2, these sticks form a tripod base. By Panel 3, more sticks are added to consolidate the structure. Panel 4 displays ropes tied around the upper section of the sticks. Then, Panel 5 illustrates how canvas is draped over the frame, while panels are adjusted for proper fitting in Panel 6. Panel 7 further highlights the process of securing the canvas with ropes. Finally, Panel 8 introduces metal pins, presumably to anchor the teepee to the ground. Panel numbers are indicated by the surrounding plain dark squares, sequentially numbered from 1 to 8 at each panel’s top-left corner. No numerical data points, percentages, or graphs are presented within this instructional graphic.
Given the complexity of the image, the above description may not be entirely accurate.
Note: Both the topic and the answer were created by one of our users.

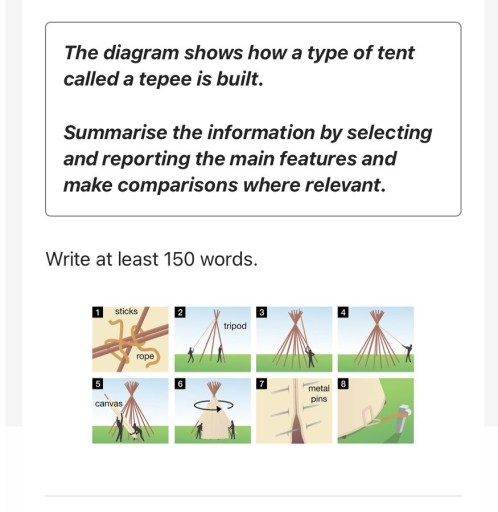
The pictures highlight the steps involved in setting a type of tent called a tepee. Overall, the diagram shows that there are 8 stages in total in the process of building a tepee, beginning with sticks and ropes being tied and finishing with a tent being hooked to the nails.

In the initial stages of the process, rope and sticks are the prepared material before being set up. The sticks are raised up like a tripod by pulling the rope. After that, many branches are added to three-legged stand to make tent stronger and ensure that fabric is then fully stretched. The pieces of wood are subsequently tied by twisting the cord.

Once this stage has been completed, a white canvas will be covered around the previously erected sticks. In the next stage, a number of metal pins are attached to the fabric to make them leak-free. Finally, the hook under the cloth will be tied a string and then hooked to the nails that were previously driven into the ground.

Word Count: 171

Answers On The Same Topic:

The diagram shows how a type of tent called a tepee is built. Summarise the information by selecting and reporting the main features and make comparisons where relevant.

At those pictures we can see the steps of making a tent which type called a tepee. Firstly you need to take a wooden sticks and tie them with a strong rope. Create a tripod and start by adding more wooden sticks. After that rope the top of the tent for it to stay stable. […]

The diagram shows how a type of tent called a tepee is built. Summarise the information by selecting and reporting the main features and make comparisons where relevant.

The given pictures describe the steps required to build a kind of tent named a tepee. The process contains eight periods, which can be divided into two main stages, including initial frame and outer making. The first stage has four steps. Firstly, we tie three long sticks of the same length together by using a […]

The diagram shows how a type of tent called a tepee is built. Summarise the information by selecting and reporting the main features and make comparisons where relevant.

The given diagram shows the linear process used by humans to build a type of tent called a tepee. The process includes seven steps begins with people use rope to tie three sticks together and finishes when the tent is fixed to the ground. First of all, people use the end of rope to tie […]

The diagram shows how a type of tent called a tepee is built. Summarise the information by selecting and reporting the main features and make comparisons where relevant.

The given diagram shows the linear process used by humans to build a type of tent called a tepee. The process include seven steps begins with people use rope to tie 3 sticks together and finishes when the tent is fix to the ground. First of all, people use the end of rope to tie […]

The diagram shows how a type of tent called a tepee is built. Summarise the information by selecting and reporting the main features and make comparisons where relevant.

The diagrams describe a way to created a tent called tepee. Overall, there are 8 steps, start with prepare some sticks and rope, finally finished the tent with a mount that has wire attach. Firstly, to prepare built a tent, you need some sticks also ropes. You need to wrap the sticks with your rope […]

See All

Other Topics:

the diagram below shows the recyling process of aluminium cans. summarise the information by selecting and reporting main features and make comparisons where relevant.

The flow chart illustrates the multi-stage process through which the aluminium cans are recycled. Overall, it is rather sophisticated process which consists 6 stages starting from consumer reuse and collection of used cans and ending with production of newly manufactured cans which ready for reuse. The process commences when the collection is done, where used […]

You should spend about 20 minutes on this task. The diagram below shows how Olive Oil is manufactured. Write a report for a university lecturer describing the information below. You should write at least 150 words.

The diagram illustrate olive oil manufacturing process with details Overall,this journey start with the planting olive trees and collecting its fruit which is called olives and send those to a process chain In the end of the process olives turns to oil and get in to our homes. Initially, Olives grow up and be ready […]

the diagram below shows the production of a lead pencil. summarise the information by selecting and reporting the main features

The essay will explain a diagram which is about the production process of lead pencil.Each stages will explain detailly Initially this process starts with a seed just about 4 months later it turns to replanted phase after the second process called replanted thinned stage start and it takes approximately 3 years. After thinned stage factory […]

The diagram shows how an LED (light emitting diode) flashlight works. Summarise the information by selecting and reporting the main features, and make comparisons where relevant.

The pictures demonstrates the internal structures of an LED flashlight and expalin how it funtions. Overall, the flashlight comprises a bulb, two batteries connected to a metal spring, a switch with metal contacts at each end. The light is turned on or off completing or breaking an electric circuit that allows current to pass through […]

The diagram shows how an LED (light emitting diode) flashlight works. Summarise the information by selecting and reporting the main features, and make comparisons where relevant.

The picture demonstrates the extermal of an light emmiting diode flashlight and explain how it funtions Overall, it can be seen that the LED has two batteries and a switch to regulate. The light depens on the switch. In outside, the LED comprises a bulb, switch button and a plastic case. Inside, there are two […]

The diagram below outlines the features and design of a contemporary landfill used for household waste management.

The diagram depicts the design of a modern landfill and its aspects and how it is used to manage household garbage. Overall, the design includes three stages, such as construction, usage and closure. Whereas construction represents how landfill is made, the two remaining stages show potential use and what happens after landfill is closed. At […]

See All
We have detected unusual activity on your device.
Please verify your identity to continue.
Note: This verification step won't sign you in. If you have a premium account, please log in to access the service as usual.
Google/Gmail Verification
Or verify using Email/Code
We've sent a verification code to:
youremail@gmail.com (Not your email?)
Enter it below to complete the verification process.
Ensure your email address is correct, your inbox is not full, and you check your spam folder. If no email arrives, consider using an alternative email.
You will need a Premium plan to perform your action!
Note: If you already have a premium account, please log in to access our services as usual.

Plans & Pricing

Our mission is to make quality education accessible for everyone.
However, to keep our hardworking team running and this service alive, we genuinely need your support!
By opting for a premium plan, not only do you sustain us in achieving the mission, but you also unlock advanced features to enrich your learning experience.

Free

For learners who aren't pressed for time

What's included on Free
100+ Cambridge IELTS Tests
Instant IELTS Writing Task 1 & 2 Evaluation (2 times/month)
Instant IELTS Speaking Part 1, 2, & 3 Evaluation (5 times/month)
Instant IELTS Writing Task 1 & 2 Essay Generator (2 times/month)
500+ Dictation & Shadowing Exercises
100+ Pronunciation Exercises
Flashcards
Other Advanced Tools

Premium

For those serious about advancing their English proficiency, and for IELTS candidates aspiring to boost their band score by 1-2 points (especially in writing & speaking) in just 30 days or less

What's included on Premium
Save Your IELTS Test Progress
Unlock All Courses & IELTS Tests
Unlimited AI Conversations
Unlimited AI Writing Enhancement Exercises
Unlimited IELTS Writing Task 1 & 2 Evaluation
Unlimited IELTS Speaking Part 1, 2, & 3 Evaluation
Checked Answers Will Not Be Published
Unlimited IELTS Writing Task 1 & 2 Essay Generator
Unlimited IELTS Speaking Part 1, 2, & 3 Sample Generator
Unlimited Usage Of Advanced Tools
Priority Support within 24h (12-month plan only)

Due to the nature of our service and the provided free trials, payments are non-refundable.
Nếu bạn là người Việt Nam và không có hoặc không muốn trả bằng credit/debit cards, bạn có thể thanh toán bằng phương thức chuyển khoản:


Chọn gói:
419,000₫ 277,000 ₫ cho gói 1 tháng (chỉ 9,233₫/ngày)
1,239,000₫ 597,000 ₫ cho gói 3 tháng (chỉ 6,633₫/ngày)
2,469,000₫ 1,027,000 ₫ cho gói 6 tháng (chỉ 5,706₫/ngày)
4,929,000₫ 1,417,000 ₫ cho gói 12 tháng (chỉ 3,936₫/ngày)


Sau khi chuyển khoản, vui lòng đợi trình duyệt tự động điều hướng bạn trở lại Engnovate và bạn sẽ ngay lập tức nhận được mã kích hoạt tài khoản premium.
Nếu có lỗi xảy ra, bạn có thể liên hệ với team thông qua một trong các phương thức: email đến helloengnovate@gmail.com hoặc nhắn tin qua facebook.com/engnovate.
Vì toàn bộ công cụ trên website đều có thể sử dụng thử miễn phí, Engnovate không hỗ trợ hoàn tiền.